LogoLogo
  • Release Notes
    • 2024
      • July 2024
      • June 2024
      • May 2024
      • April 2024
      • March 2024
      • February 2024
      • January 2024
    • 2023
      • December 2023
      • November 2023
      • October 2023
      • September 2023
      • August 2023
      • July 2023
      • June 2023
      • May 2023
      • April 2023
      • March 2023
      • February 2023
      • January 2023
    • 2022
      • December 2022
      • November 2022
      • October 2022
      • September 2022
      • August 2022
      • July 2022
      • June 2022
      • May 2022
      • April 2022
      • March 2022
      • February 2022
      • January 2022
  • CDP 365 INTRODUCTION
    • Overview of CDP 365
    • Feature Structure
    • CDP 365's Interface
    • Help feature
  • PERSONAS
    • Visitors & Customers
      • Data table
      • Explore data
      • Upload data
      • Apply data view
      • View profile
    • Segments
    • Plannings
    • Predictive Models
      • RFM Model
      • Lifecycle Stages
  • DATA HUB
    • Event Sources
      • Source
        • Website
        • System delivery
      • Conversion Event
    • Business Objects
      • Data Objects
        • Data table
        • Attributes
          • Custom Attribute
          • Computed Attribute
            • Event Counter
            • Aggregation
            • Most Frequent
            • First
            • Last
            • Unique List
            • Unique Count
            • Conversion Attribution
            • Virtual Custom Function
            • Schedule Custom Function
        • Collections
        • Groups
        • Setting
      • Data Views
      • Import Histories
      • Export Histories
    • Analytic Models
    • Data Schema
  • Marketing Hub
    • Customer Journeys
      • Work with Journey
        • Destination nodes
          • Web Embedded
            • Design from JSON
              • Control Toolbar
              • Setting
                • Template Setting
                • Blocks & Settings
                  • Countdown
                  • Dynamic Content
                  • Image
                  • Video
                  • Boolean
                  • Number
                  • Text
                  • Array
                  • Object
          • Line App
          • Zalo
      • Blast Campaign
      • Third-party campaigns
      • Metrics
      • Label
      • Custom Function
      • Status of Journey
    • Channel Integration - Destinations
      • All Destinations
        • Email
        • Web Personalization
        • Web Push-Notification
        • App Push Notification
        • Smart Inbox
        • Conversation
        • Webhook
        • SMS
        • Viber
        • Whatsapp
        • Line
        • Zalo
        • File Transfer
    • Promotion Center
    • Media Template
      • Control Toolbar
      • Settings
        • Template Settings
          • Basic
          • Advanced
        • Blocks & Settings
          • Columns
          • Text
          • Image
          • Button
          • Optin Fields
            • Email
            • Phone
            • Dropdown select
            • Datetime
            • Radio button/ Checkbox
            • Privacy Notice
          • Yes/No
          • Count down
          • Video
          • Coupon Wheel
          • Spacer
          • Divider
          • Icon
          • HTML
          • Slide show
          • Group
          • Rating
          • Table
          • Shake and Win
          • Lucky gift box
          • OTP Verification
      • Layers
      • Live Preview
    • Email Template
      • Control Toolbar
      • Settings
        • Email Template Settings
          • Basic
          • Advanced
        • Blocks & Settings
          • Columns
          • Text
          • Image
          • Button
          • Count down
          • Spacer
          • Divider
          • Icon
          • HTML
          • Menu
          • Table
          • Unsubscribe
          • Group
      • Layers
      • Live Preview
    • Link Management
  • Insights
    • Quick start guide
    • Data Source
      • Create a data source
    • Reports
      • Create reports
        • About reports
        • Build, stylize, and add data to reports
          • Set report date ranges
          • Add and configure components
          • Chart references
            • Area chart reference
            • Bar chart reference
            • Bullet chart reference
            • Geo chart reference
            • Line chart reference
            • Pie chart reference
            • Pivot table reference
            • Scatter and bubble chart reference
            • Scorecard reference
            • Table reference
            • Time series reference
            • Tree map reference
          • Add reference lines to charts
          • Add and edit data
          • Add pages and report navigation
          • Report layout options
          • Work with color
          • Add text, images, lines, and shapes
          • Arrange and distribute components
          • Use the Insights Report Editor
        • Copy a report
        • Delete a report
        • Tutorial: Create a new report
      • Filter your data
        • About filters
        • Create, edit, and manage filters
        • Configure filter conditions
        • Filter examples
      • Make reports interactive
        • Let your viewers control the date range
        • About controls
        • Use controls across data sources
        • Add chart interaction filters
        • Let viewers drill down into your data
        • Link to a page
        • Export data from a chart
        • Embed external content in reports
        • Let viewers select the fields in charts
      • Blend multiple data sources in a chart
        • About data blending
        • Blend data in charts
        • Filter blended data
        • Change the date range for blended data
        • Use blending to reaggregate data
      • Glossary
        • Aggregation
        • Blended data
        • Chart
        • Component
        • Component, report-level
        • Connector
        • Data set
        • Data source
        • Dimension
        • Edit mode
        • Field
        • Join key
        • Metric
        • Owner
        • Page
        • Properties panel
        • Report
        • View mode
        • Viewer (user type)
  • DATAFLOWS
    • Dataflows
      • Creating a Dataflows
        • Action node
          • Add data
          • Delay
          • Filter
          • Script
          • SQL
          • Branch
          • Add column
          • Aggregate
          • Select column
          • Join
          • Bin
          • Merge Columns
          • Split Columns
          • Group
          • Union Rows
          • Save data
        • Destination channel
          • Send mail
          • Export to Google Sheet
          • Google Audience
          • Facebook Audience
          • Big Query
          • Postgre
          • Export to CDP 356 Events
          • Export to CDP 365 Business Object
          • Export to CDP 365 Segment
      • Work with Dataflow
      • Status of Dataflow
    • Data Destinations
      • Create a Data Destination
      • View/Edit a Data Destination
      • Data Destinations Connectors
        • Amazon S3
        • CDP Coupon
        • Google Audiences
        • CDP Business Object
        • CDP Segment
        • CDP Event
        • Audience SaleForce Maketing Cloud
        • Google BigQuery
        • Facebook Audiences
        • Google Ads Audiences
        • Postgres
        • Send Mail
        • Google Sheet
    • Data Source
      • Create a Data Source
      • View/Edit a Data Source
      • Data Source Connectors
        • Google Sheets
        • Oracle
        • KiotViet
        • Elastic Search
        • Haravan
        • Tiki
        • Sapo
        • Lazada
        • Shopee
        • Fanpage Messages
        • Google Analytics
        • CDP ANTSOMI
        • Trello
        • Google Ads
        • Facebook Ads
        • Youtube
        • PostgreSQL
        • MySQL
        • File Upload (Big Table)
        • Business Object
        • JSON API
        • SQL Workspace
        • CDP 365 Segment's Members
        • Analytic Model Antsomi
        • SQL Server
  • PORTAL SETTINGS
    • Overview
    • Data Protect
    • General Setting
      • Roles
    • Accounts
    • IP Restriction
    • Menus
    • Account Sharing
  • Annotation
    • Conditions
    • Time range
    • Data Format
    • Function List
  • TICKET MANAGEMENT
    • Tickets
  • Use cases
    • Personas
      • Visitors/Customers
        • How to add new and update Customers to CDP
        • How to create a Customer Custom Attribute
        • How to create a Customer Computed-Last Attribute
      • Segments
        • How to export .xml file?
        • How to create a Dynamic Segment
        • How to create a Static Segment (Matching file)
        • How to create a new segment?
        • Create a segment for Cart Abandonment
        • Set up a "Segment" containing emails to be excluded before sending mail
      • How to create "Attribute" for "Customer"/"Visitors"?
    • Data Hub
      • Event Sources
        • Set up Event Tracking code to track events into CDP
        • Set up Event Tracking code to track events into CDP
        • How to check data after you track an event on the website and app?
      • Business Objects
        • How to create "Data Source" connected with the "Data Object" of CDP 365
        • How to create a Collection
        • How to create "Custom Attributes" with Input via UI feature
    • Marketing Hub
      • How do I set up an advertising SMS campaign using the SMS FPT destination?
      • Strengthening User Identity Verification with OTP Authentication
      • How to use Line Message Templates?
      • How to set up a Webhook Journey
      • How to set up a campaign using SMS channel
      • How to setup a campaign using App Notification channel?
      • How to configure a smart inbox campaign? (In Progress...)
      • How to calculate conversion goals for a journey?
      • How to recommend products using the Parent-Child Algorithm
      • How to create Branded domain in Link Management?
      • How to send messages using OneWay SMS destination?
      • How to explore Journeys?
      • How to test a Journey using Email channel?
      • How to send marketing email using Mailgun Destination?
      • How to send marketing SMS using One Way SMS Destination?
      • How to create Web Personalization using Media JSON in CDP 365?
      • How to create an Email Customer Journey?
      • How to create a Web personalization journey?
      • How to create a "Trello Card" using CDP 365
      • How to display template on website using CDP 365
      • Initialize customer after submitting form
      • How to create Customer Journey?
      • How to set up some Inline templates
      • How to monitor campaign performance?
      • How to create "Promotion"/"Coupon" by uploading files?
      • How to create Coupon from Magento or ERP system to CDP 365?
      • How to send "SMS Yondu" using CDP 365
      • How to send mail from email upload?
      • How to send "Zalo Notification Service" using CDP 365
      • How to send message using "FB Messenger" in CDP
      • How to Send SMS using "Klasik SMS" in CDP 365
      • How to push notification "Firebase Cloud Messaging" using CDP 365
      • How to Send email using "Amazon SES" in CDP 365
      • How to define zone in website for improve web personalize performance
      • How to Send "Viber Yondu" using CDP 365
      • How to send "Infobip Viber" using CDP 365
      • How to send "eSMS Viber" using CDP 365
      • How to create a new "Display Zone"
      • How to Send SMS using "Telerivet SMS" in CDP 365
      • How to push notification using "Onesignal (App Push)" in CDP 365
      • How to push notification using Antsomi Web Push in CDP 365?
      • How to Send email using "SendGrid" in CDP 365
      • How to send email using "Mailjet" in CDP 365?
      • How to send WhatsApp message in CDP 365?
      • How to send Telegram message in CDP 365?
      • How to track click metric of OneSignal App Push
      • How to send Ticket from CDP 365 to Antbuddy?
    • Insights
      • How to create "Report" with “Journey performance” data source?
      • How to create a new "Data sources"?
    • Dataflows
      • How can I export data from CDP 365 to Google Sheets?
      • Collect data from TikTok Form to CDP 365
      • How to create a Segment Data Source
      • How to create a report from multiple data sources?
      • How to send messages using "Facebook Messenger" in CDP 365
      • How to create a new Google Analytics data source?
      • How to create Facebook Ads data source?
      • How to create Google Ads data source?
      • How to create a "Destination Channel" in "Dataflows"?
      • Set up Dataflows to push data to a Business Object in CDP 365
      • Set up Dataflows to push data to Google and Facebook Audiences
      • How to upload segment data into Google Ad Manager (GAM) 360 using Dataflow?
    • Portal Settings
      • How to set up two-step authentication?
Powered by GitBook
On this page
  • 1. Hover your mouse over Settings and go to the Web Personalize menu
  • 2. Click + to create a Display Zone
  • 3. Input the necessary information to create a Display Zone
  • 4. After filling in the info, click Save button to finish creating the Display Zone
  • Get the Zone script
  • Get id or class on the Website

Was this helpful?

  1. Use cases
  2. Marketing Hub

How to create a new "Display Zone"

PreviousHow to send "eSMS Viber" using CDP 365NextHow to Send SMS using "Telerivet SMS" in CDP 365

Last updated 9 months ago

Was this helpful?

1. Hover your mouse over Settings and go to the Web Personalize menu

2. Click + to create a Display Zone

3. Input the necessary information to create a Display Zone

Field
Description

Display Zone name

Input the name that you want

Domain

Input your website domain

Zone Code

Code of new Zone is automatically added by the system but you can edit it
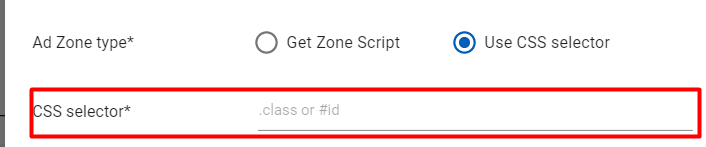
Zone type

4. After filling in the info, click Save button to finish creating the Display Zone

Get the Zone script

  1. Hover your mouse over Settings -> Choose Web Personalize

3. Click Copy to clipboard to copy your Zone Script

Get id or class on the Website

  1. Go to your website

  2. Press F12 (or Fn + F12) to open Developer Tools

4. Find the location where you want to display the Ad, then click on that location to display id or class

For example:

5. Copy the id or class into the Create Display Zone interface.

NOTE:

+ Add "#" in front of the id (Example: #maincontent)

+ Add "." in front of the class (Example: .page-main)

For example:

Note: If there are many classes in a div tag, you must replace the space with a "."

Get the "CSS selector" - this way is used when the class names are duplicated in many places on this page

- Right click on the div tag -> Copy -> Copy selector

Paste the content you just copied into the CSS Selector field in the Create Display zone interface

In case the level of div is not determined, you can use the following way:

Code example:

<div class="class-cha class-cha-02">
  <div class="class-con class-con-02">
    <div class="class-chau class-chau-02"></div>
  </div>
</div>

Like the above example, there are ways to get the "class-chau" div

  1. .class-cha.class-cha-02 > .class-con > .class-chau

  2. .class-cha.class-cha-02 .class-chau

Locate class or id on the website

  1. Go to your website

  2. Press F12 (or Fn + F12) to open Developer Tools

  3. Press Ctrl + F to open search box at Elements tab

4. Input id or class that you want

5. Search results will be highlighted, hover over the search results to see the location on the website

Get Zone script: After creating Zone successfully, the system will generate Zone script. Put this Zone script in the position where you want to display the ad on the website. You can see how to get the Zone script .

Use CSS Selector: Input Class or ID of the div tag where you want to show the Ad. You can see how to get the class or id

At the Display Zone listing, hover your mouse over the zone you want to get the script -> Click icon

Click icon

here
here