> For the complete documentation index, see [llms.txt](https://docs.antsomi.com/cdp-365-user-guide-en/llms.txt). Markdown versions of documentation pages are available by appending `.md` to page URLs; this page is available as [Markdown](https://docs.antsomi.com/cdp-365-user-guide-en/use-cases/data-hub/business-objects/how-to-create-custom-attributes-with-input-via-ui-feature.md).
# How to create "Custom Attributes" with Input via UI feature
## Input via UI is available for "Custom Attribute" of 3 Data Objects: "Journey", "Campaign", "Variant"
1. Log into the **CDP** **365** system.
2. Hover your mouse over **Data** on the left hand side menu -> Choose **Data Objects**
3\. Select the object that you want to create a **Custom Attribute** that supporting Input via UI
4\. In the **Attributes** tab, select the  icon
Enter data for fields **Attribute Name** (required), **Description** (not required) .
5\. In the **Data type** section, select options and it will display the Input via UI field (**\***).
6\. By default, checkbox Input Via UI is unchecked and when checked it will display a Dropdown for selecting Input type.
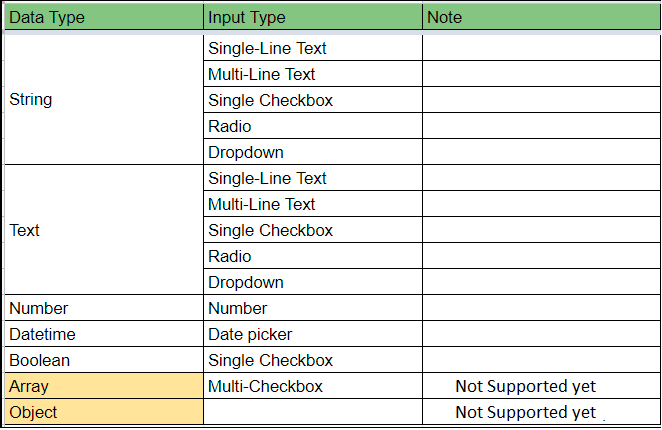
7\. The **Input Type** list will depend on the previously selected **Data Type**; with the data type of **Number**, we have an input type that is also a **Number**.
8\. After completing the above steps, click **Save** button.
List of "**Input Type"** correspond to "**Data Type"**
**\*** If the Input type is "**Dropdown"** option, Popup will be displayed as below:
Enter data into the **Labels**.
The position of filed can be adjusted in Data Object setting by drag and drop
After the custom attribute was created successfully, it will be displayed in the Journey setting as below:
\* If the Input type is "Radio" option, Popup will be displayed as follow:
\* Journey setting screen after custom attribute was created successfully
\* If "Data Type" is selected as "Datetime", the Input type will be "Date picker", the popup will be displayed as follows:
After switching to Journey screen:
You can modify column in the listing journey to see the value of Custom Attribute.
## The settings and steps for Campaign and Variant similar to Journey.
---
# Agent Instructions
This documentation is published with GitBook. GitBook is the documentation platform designed so that both humans and AI agents can read, navigate, and reason over technical content effectively. Learn more at gitbook.com.
## Querying This Documentation
If you need additional information that is not directly available in this page, you can query the documentation dynamically by asking a question.
Perform an HTTP GET request on the current page URL with the `ask` query parameter, and the optional `goal` query parameter:
```
GET https://docs.antsomi.com/cdp-365-user-guide-en/use-cases/data-hub/business-objects/how-to-create-custom-attributes-with-input-via-ui-feature.md?ask=&goal=
```
`ask` is the immediate question: it should be specific, self-contained, and written in natural language.
`goal` is optional and describes the broader end goal you are ultimately trying to accomplish on behalf of the user. GitBook uses it to tailor the answer towards what is most useful for that goal.
The response will contain a direct answer to the question and relevant excerpts and sources from the documentation.
Use this mechanism when the answer is not explicitly present in the current page, you need clarification or additional context, or you want to retrieve related documentation sections.