> For the complete documentation index, see [llms.txt](https://docs.antsomi.com/cdp-365-user-guide-en/llms.txt). Markdown versions of documentation pages are available by appending `.md` to page URLs; this page is available as [Markdown](https://docs.antsomi.com/cdp-365-user-guide-en/marketing-hub/channel-integration-destinations/all-destinations/email.md).

# Email

## Antsomi Email

Antsomi email destination includes the following settings:

<figure><img src="https://826840553-files.gitbook.io/~/files/v0/b/gitbook-x-prod.appspot.com/o/spaces%2FbtU4vFUxT5JkWYHePuoX%2Fuploads%2FQx8bZvJpoucylZoJunxe%2Fimage.png?alt=media&amp;token=2b66bf0c-ad8d-4502-92bd-e1867852f7f7" alt=""><figcaption></figcaption></figure>

### Configure fields

* *Identity type:* You are identified by a domain
* *Domain:* Input your domain or subdomain
* *From Email Address:* The send's email address
* *From Email Name:* The sender's name
* *To Addresses:* The receiver's email address

### **Verifying your domain**

The instruction to verify your domain

### **Advanced DKIM Settings**

There are two ways to verify your domain:&#x20;

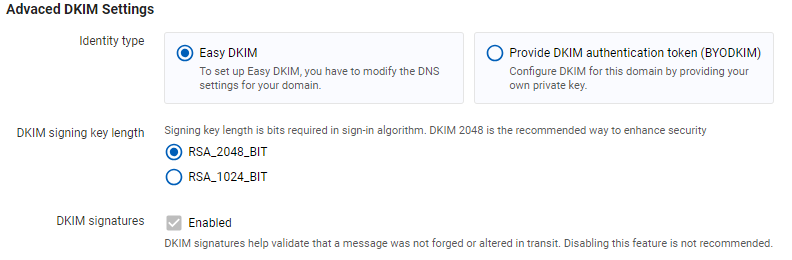
* **Easy DKIM**

<figure><img src="https://826840553-files.gitbook.io/~/files/v0/b/gitbook-x-prod.appspot.com/o/spaces%2FbtU4vFUxT5JkWYHePuoX%2Fuploads%2FqUnA0at4gMTmMBic3iZL%2Fimage.png?alt=media&amp;token=fd2de947-2000-48b1-890a-681bd71ac37d" alt="" width="375"><figcaption><p><em>Easy DKIM</em></p></figcaption></figure>

When you set up Easy DKIM for a domain identity, Amazon SES automatically adds a 2048-bit DKIM key to every email that you send from that identity.

In the DKIM signing key length field, choose either [RSA\_2048\_BIT or RSA\_1024\_BIT](https://docs.aws.amazon.com/ses/latest/dg/send-email-authentication-dkim.html#send-email-authentication-dkim-1024-2048).

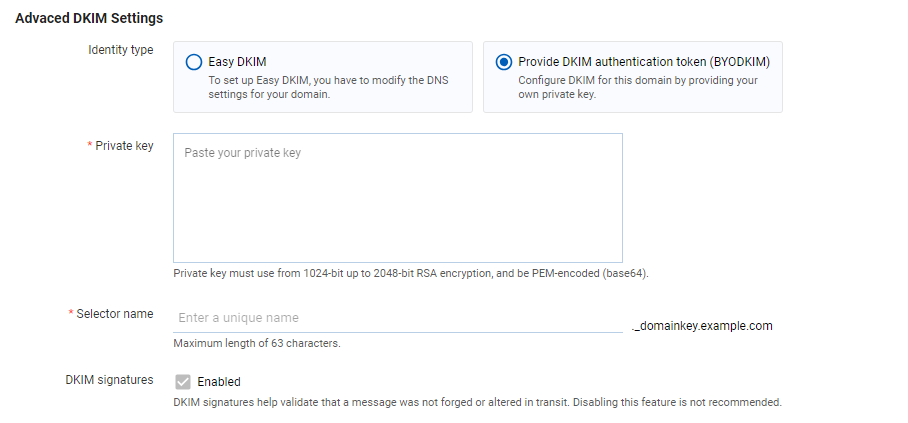
* **Provide DKIM authentication token (BYODKIM)**

<figure><img src="https://826840553-files.gitbook.io/~/files/v0/b/gitbook-x-prod.appspot.com/o/spaces%2FbtU4vFUxT5JkWYHePuoX%2Fuploads%2FZcqb8XYL8Em4tg22yBDB%2Fimage.png?alt=media&amp;token=0e3e3192-0d23-4428-89bf-50969907451b" alt="" width="375"><figcaption><p>BYODKIM - Bring your own DKIM</p></figcaption></figure>

*Private key:* Input the private key of your domain

*Selector name:* Unique selector that you specified when you created the TXT record in the DNS configuration for your domain.

## Onesignal Email

<figure><img src="https://826840553-files.gitbook.io/~/files/v0/b/gitbook-x-prod.appspot.com/o/spaces%2FbtU4vFUxT5JkWYHePuoX%2Fuploads%2FLEgQKO6rmBfhc1urpJwO%2FDestination%20-%20Email%20-%20Onesignal.png?alt=media&amp;token=6bc7324d-0021-457f-8ae0-3b978e79c68f" alt=""><figcaption></figcaption></figure>

<table><thead><tr><th width="253">Field</th><th>Description</th></tr></thead><tbody><tr><td>App ID</td><td>The ID of the app</td></tr><tr><td>App Secret</td><td>Is a code used to unlock the application</td></tr><tr><td>User ID</td><td>ID of user</td></tr><tr><td>Email From Name</td><td>Sender name</td></tr><tr><td>Email From Address</td><td>Sender email</td></tr></tbody></table>

## Sendgrid

<figure><img src="https://826840553-files.gitbook.io/~/files/v0/b/gitbook-x-prod.appspot.com/o/spaces%2FbtU4vFUxT5JkWYHePuoX%2Fuploads%2FqCOucdD9HFwQLU3Tem7X%2FDestination%20-%20Email%20-%20Sendgrid.png?alt=media&amp;token=349e30ed-4697-4c20-a8d9-fcce53c85129" alt=""><figcaption></figcaption></figure>

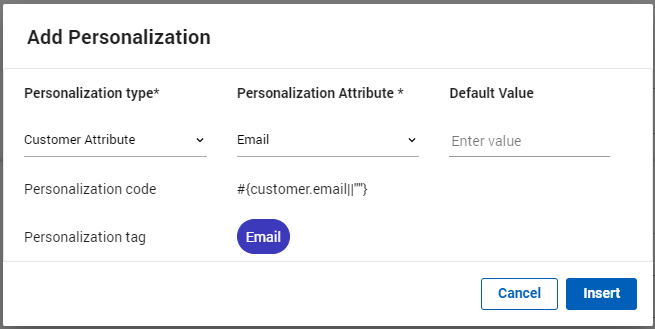
<table><thead><tr><th width="263">Field</th><th>Description</th></tr></thead><tbody><tr><td>To Email</td><td><ul><li>Email recipients</li><li>Click the <img src="https://826840553-files.gitbook.io/~/files/v0/b/gitbook-x-prod.appspot.com/o/spaces%2FbtU4vFUxT5JkWYHePuoX%2Fuploads%2F7QvKkT5Td9ofJ83uCET4%2Fimage.png?alt=media&amp;token=d22194af-1678-4294-a7c9-603d3938e850" alt=""> icon to add Personalization</li></ul><p><img src="https://files.gitbook.com/v0/b/gitbook-x-prod.appspot.com/o/spaces%2FmECwNqMNUmu6OXHSYgDv%2Fuploads%2FyRBaTMkLooiimsV3VUIA%2Fimage.png?alt=media&#x26;token=85d0ae63-9c53-437b-9bef-982a74151e34" alt="" data-size="original"></p><p><img src="https://files.gitbook.com/v0/b/gitbook-x-prod.appspot.com/o/spaces%2FmECwNqMNUmu6OXHSYgDv%2Fuploads%2FcGa7ClhQ3TwLyJSH5Ibu%2Fimage.png?alt=media&#x26;token=2c22b4ec-582e-4b6a-946a-e7124cc75837" alt="" data-size="original"></p><p></p></td></tr><tr><td>CC Email</td><td>Use to send an email to many people at the same time</td></tr><tr><td>API Key</td><td>​<a href="https://app.gitbook.com/o/-LzunofLVjpTa_-p1PQt/s/mECwNqMNUmu6OXHSYgDv/quick-start-guide/how-to-send-email-using-sendgrid-in-cdp-365#how-to-create-api-key-on-sendgrid">API key that you created on SendGrid</a></td></tr><tr><td>From Email Name</td><td>Sender name</td></tr><tr><td>From Email Address</td><td>Email sends to customers</td></tr><tr><td>Unsubscribe Group Id</td><td><a href="https://app.gitbook.com/o/-LzunofLVjpTa_-p1PQt/s/mECwNqMNUmu6OXHSYgDv/quick-start-guide/how-to-send-email-using-sendgrid-in-cdp-365#how-to-create-an-unsubscribe-group">ID of Unsubcribe Group that you create on SendGrid (optional)</a></td></tr></tbody></table>

## G Suite Email

<figure><img src="https://826840553-files.gitbook.io/~/files/v0/b/gitbook-x-prod.appspot.com/o/spaces%2FbtU4vFUxT5JkWYHePuoX%2Fuploads%2FHtx28s2QNwj27HFLFtSJ%2FDestination%20-%20Email%20-%20G-suit%20email.png?alt=media&amp;token=ce34ce38-e195-4265-a344-865243b1e4fd" alt=""><figcaption></figcaption></figure>

<table><thead><tr><th width="247">Field</th><th>Description</th></tr></thead><tbody><tr><td>Email</td><td>Receiver email</td></tr><tr><td>From Email Name</td><td>Sender name</td></tr><tr><td>Username</td><td>Sender email</td></tr><tr><td>Password</td><td>Sender email pass</td></tr></tbody></table>

## Amazon SES

<figure><img src="https://826840553-files.gitbook.io/~/files/v0/b/gitbook-x-prod.appspot.com/o/spaces%2FbtU4vFUxT5JkWYHePuoX%2Fuploads%2F4Y36WZQ5MgQLi5MoOmXM%2FDestination%20-%20Email%20-%20Amazon%20SES.png?alt=media&amp;token=795198b7-0a2f-49ae-8a85-c51124559b7d" alt=""><figcaption></figcaption></figure>

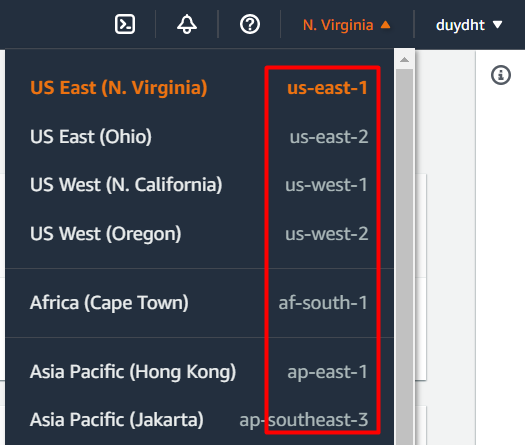
<table><thead><tr><th width="216">Field</th><th>Description</th></tr></thead><tbody><tr><td>Email</td><td><ul><li>Receiver email</li><li>Click the <img src="https://826840553-files.gitbook.io/~/files/v0/b/gitbook-x-prod.appspot.com/o/spaces%2FbtU4vFUxT5JkWYHePuoX%2Fuploads%2FqDZ1OwSazCbwJQR61FCp%2Fimage.png?alt=media&amp;token=9aa7cc76-8935-4b65-9033-5da8839f7603" alt=""> icon to add Personalization</li></ul><p><img src="https://files.gitbook.com/v0/b/gitbook-x-prod.appspot.com/o/spaces%2FmECwNqMNUmu6OXHSYgDv%2Fuploads%2FyRBaTMkLooiimsV3VUIA%2Fimage.png?alt=media&#x26;token=85d0ae63-9c53-437b-9bef-982a74151e34" alt="" data-size="original"></p><p></p><p><img src="https://files.gitbook.com/v0/b/gitbook-x-prod.appspot.com/o/spaces%2FmECwNqMNUmu6OXHSYgDv%2Fuploads%2FrN8x5pFXD06amSNkuvwb%2Fimage.png?alt=media&#x26;token=811dabe2-ac8b-4837-8891-88e49600c54f" alt="" data-size="original"></p></td></tr><tr><td>Access Key</td><td>​<a href="https://app.gitbook.com/o/-LzunofLVjpTa_-p1PQt/s/mECwNqMNUmu6OXHSYgDv/quick-start-guide/how-to-send-email-using-amazon-ses-in-cdp-365#get-your-access-key-id-and-secret-access-key">Get your access key ID and secret access key</a></td></tr><tr><td>Secret Key</td><td>​<a href="https://app.gitbook.com/o/-LzunofLVjpTa_-p1PQt/s/mECwNqMNUmu6OXHSYgDv/quick-start-guide/how-to-send-email-using-amazon-ses-in-cdp-365#get-your-access-key-id-and-secret-access-key">Get your access key ID and secret access key</a></td></tr><tr><td>Region</td><td><p>The region where email is verified </p><p><img src="https://files.gitbook.com/v0/b/gitbook-x-prod.appspot.com/o/spaces%2FmECwNqMNUmu6OXHSYgDv%2Fuploads%2FfTupBie2WQUOB4pWevvh%2Fimage.png?alt=media&#x26;token=3e58b660-a452-4c81-bb4c-52fc47f1b782" alt="" data-size="original"></p></td></tr><tr><td>From Email Name</td><td>Sender name</td></tr><tr><td>From Email Address</td><td>A regional email address verified with Amazon SES</td></tr></tbody></table>

## Sendinblue

<figure><img src="https://826840553-files.gitbook.io/~/files/v0/b/gitbook-x-prod.appspot.com/o/spaces%2FbtU4vFUxT5JkWYHePuoX%2Fuploads%2FNdh7TIvIlq4zdLn4528f%2FDestination%20-%20Email%20-%20Sendinblue.png?alt=media&amp;token=55aaf8c8-866f-4213-89a6-327d2c831a42" alt=""><figcaption></figcaption></figure>

<table><thead><tr><th width="260">Field</th><th>Description</th></tr></thead><tbody><tr><td>Email</td><td>Receiver email</td></tr><tr><td>API Key</td><td>API key created on Sendinblue</td></tr><tr><td>From Email Name</td><td>Sender name</td></tr><tr><td>From Email Address</td><td>Email sends to customers</td></tr></tbody></table>

## Infobid

<figure><img src="https://826840553-files.gitbook.io/~/files/v0/b/gitbook-x-prod.appspot.com/o/spaces%2FbtU4vFUxT5JkWYHePuoX%2Fuploads%2FfvpLkdEcGwvLLBDpGYFZ%2FDestination%20-%20Email%20-%20Infobid.png?alt=media&amp;token=38ba9b72-51c7-4aea-b34e-9784e22fdc6e" alt=""><figcaption></figcaption></figure>

<table><thead><tr><th width="271">Field</th><th>Description</th></tr></thead><tbody><tr><td>Email</td><td>Receiver email</td></tr><tr><td>Base URL</td><td>As a basis for the platform to determine the originator of each API request</td></tr><tr><td>API Key</td><td>API key created on Infobid</td></tr><tr><td>From Email Name</td><td>Sender name email</td></tr><tr><td>From Email Address</td><td>Email sends to customers</td></tr></tbody></table>

## Salesforce Email

<figure><img src="https://826840553-files.gitbook.io/~/files/v0/b/gitbook-x-prod.appspot.com/o/spaces%2FbtU4vFUxT5JkWYHePuoX%2Fuploads%2FOcS4SUBkwtb2Pvk7CYSh%2FDestination%20-%20Email%20-%20Salesforce%20Email.png?alt=media&amp;token=37e79d08-1e56-400e-ada7-93ffa6a6265e" alt=""><figcaption></figcaption></figure>

<table><thead><tr><th width="264">Field</th><th>Description</th></tr></thead><tbody><tr><td>Email</td><td>Receiver email</td></tr><tr><td>Client ID</td><td>ID of the customer who has registered for the service</td></tr><tr><td>Client Secret</td><td>Is a code used to unlock the application</td></tr><tr><td>Account ID</td><td>ID of the account registered for the service</td></tr><tr><td>Endpoint URL</td><td>A web address (URL) at which customers of a particular service can access it</td></tr><tr><td>Definition Key</td><td>Identifier code</td></tr></tbody></table>

## Amazon SES with Password

<figure><img src="https://826840553-files.gitbook.io/~/files/v0/b/gitbook-x-prod.appspot.com/o/spaces%2FbtU4vFUxT5JkWYHePuoX%2Fuploads%2FVPoeO9d2OUEgGA6iH7LD%2FDestination%20-%20Email%20-%20Amazon%20SES%20with%20Password.png?alt=media&amp;token=7d53cc1e-08a3-498b-8777-f6c375f237e7" alt=""><figcaption></figcaption></figure>

<table><thead><tr><th width="254">Field</th><th>Description</th></tr></thead><tbody><tr><td>Email</td><td>Receiver email</td></tr><tr><td>From Email Name</td><td>Sender name email</td></tr><tr><td>From Email Address</td><td>Email sends to customers</td></tr><tr><td>Username</td><td><strong>The username of the user</strong></td></tr><tr><td>Password</td><td><strong>The password if LOGIN or PLAIN was used</strong></td></tr></tbody></table>

## Mailchimp

<figure><img src="https://826840553-files.gitbook.io/~/files/v0/b/gitbook-x-prod.appspot.com/o/spaces%2FbtU4vFUxT5JkWYHePuoX%2Fuploads%2F2TxyvEzWezSBAzBnWSFQ%2Fimage.png?alt=media&amp;token=910a607e-ecbf-4a4c-863d-72103fe80e6b" alt=""><figcaption><p>Mailchimp Email</p></figcaption></figure>

<table><thead><tr><th width="219">Fields</th><th>Description</th></tr></thead><tbody><tr><td>API Key</td><td>The API Key in your Mailchimp account. To know how to take this key, see the instruction below.</td></tr><tr><td>From Email Name</td><td>Sender's name</td></tr><tr><td>From Email Address</td><td>Sender's Email Address</td></tr><tr><td>To Email</td><td>Receiver's Email Address</td></tr></tbody></table>

To connect CDP 365 with Mailchimp, first you have to navigate Mandrillapp and then [verify your sending domains](#verifying-your-domain) and [take an API Key](#get-api-key).

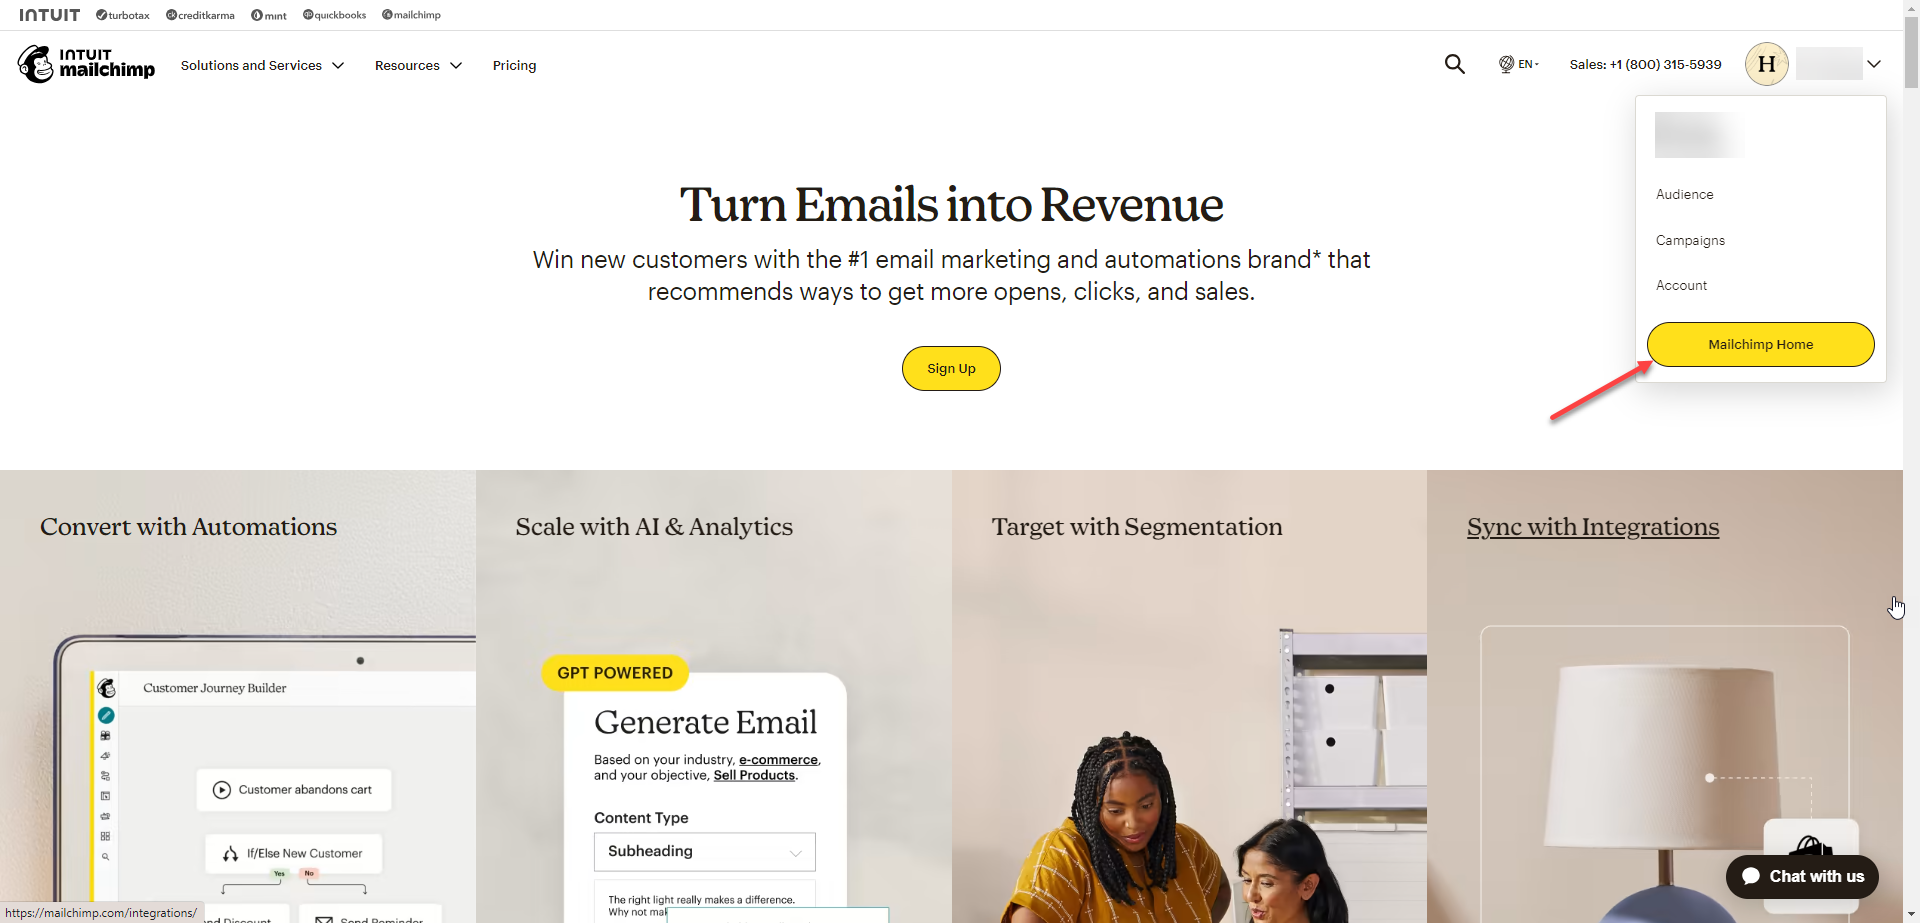
* After logging in your Mailchimp account,open the Account Information --> click Mailchimp Home

<figure><img src="https://826840553-files.gitbook.io/~/files/v0/b/gitbook-x-prod.appspot.com/o/spaces%2FbtU4vFUxT5JkWYHePuoX%2Fuploads%2FtUHXiUjseCscSp0hZPOs%2Fimage.png?alt=media&amp;token=27c19802-c947-47f4-b340-4675e69bce70" alt=""><figcaption></figcaption></figure>

* &#x20;Then, open the **Automation menu** and choose **Transactional email** --> Click **Launch App**

<figure><img src="https://826840553-files.gitbook.io/~/files/v0/b/gitbook-x-prod.appspot.com/o/spaces%2FbtU4vFUxT5JkWYHePuoX%2Fuploads%2FVOp1XI1xs84E4EAwg5HW%2Fimage.png?alt=media&amp;token=4fe08827-6fe9-474c-80c6-a3449384a531" alt=""><figcaption></figcaption></figure>

### Verify your sending domains

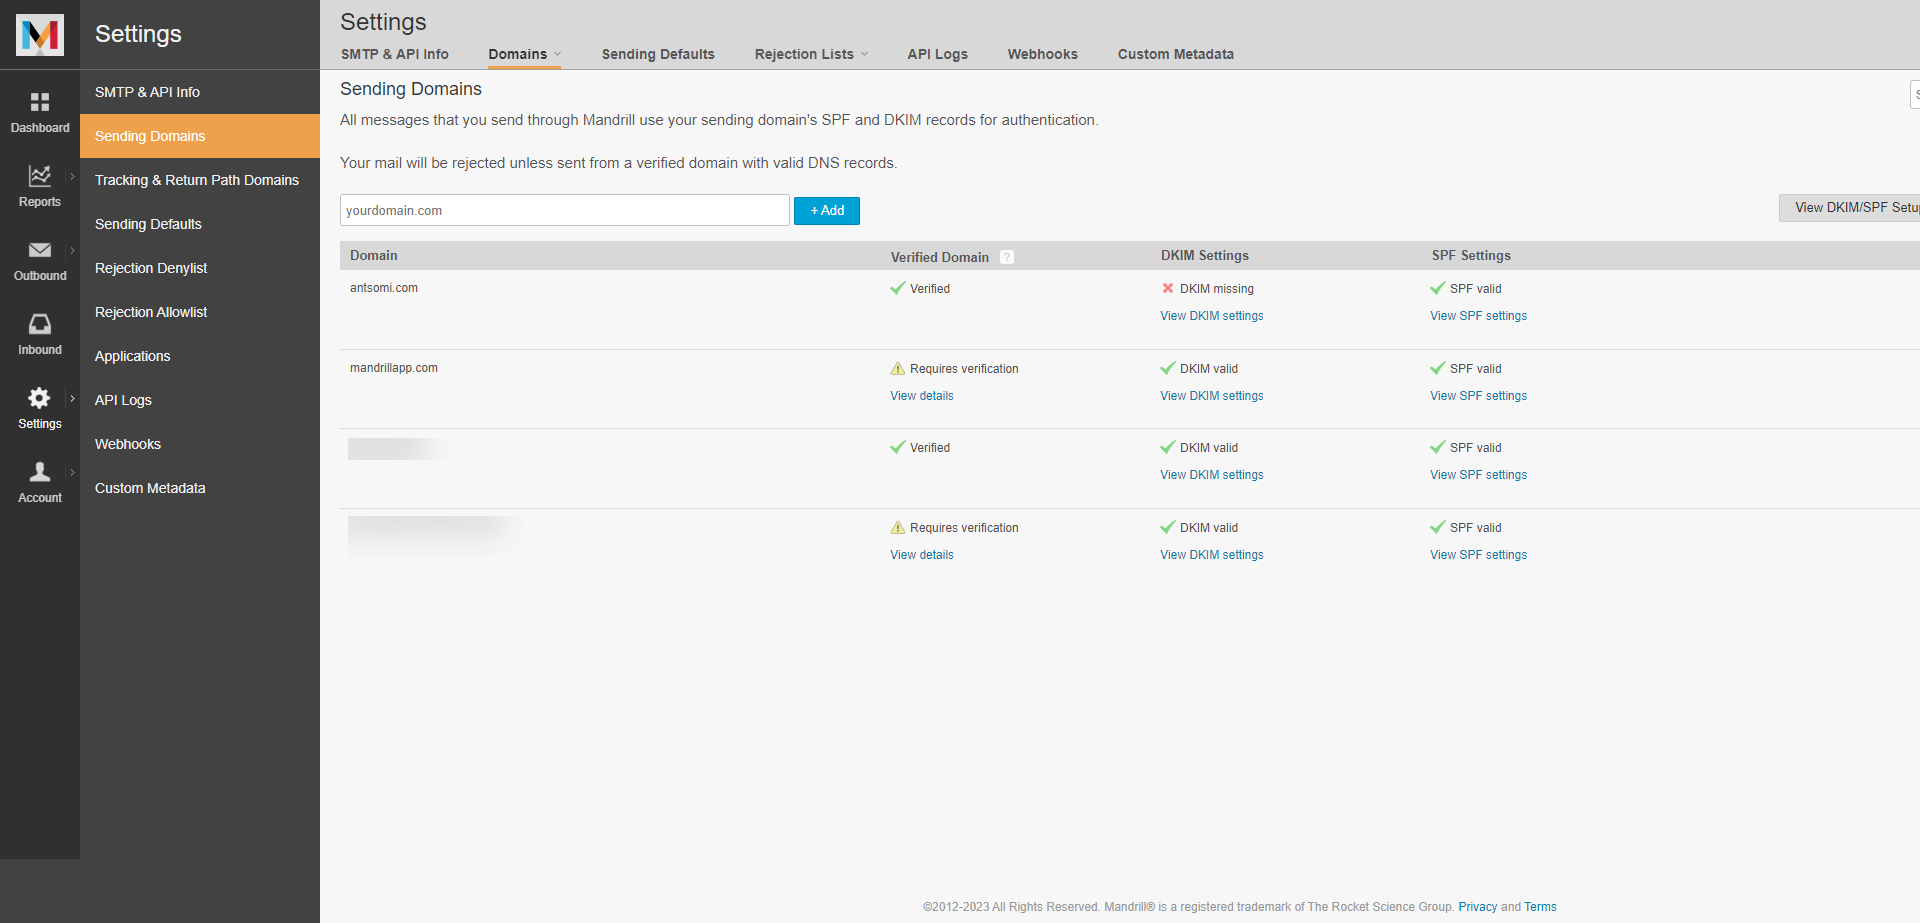
* Open Sending Domains menu&#x20;

<figure><img src="https://826840553-files.gitbook.io/~/files/v0/b/gitbook-x-prod.appspot.com/o/spaces%2FbtU4vFUxT5JkWYHePuoX%2Fuploads%2F13RSgLLqABZwEFgopANi%2Fimage.png?alt=media&amp;token=cb574052-db75-4190-be11-a35027cb8f60" alt=""><figcaption></figcaption></figure>

* Add a domain

<figure><img src="https://826840553-files.gitbook.io/~/files/v0/b/gitbook-x-prod.appspot.com/o/spaces%2FbtU4vFUxT5JkWYHePuoX%2Fuploads%2FQRqiUrA2E9mLRimFmcmJ%2Fimage.png?alt=media&amp;token=bc120048-ab4e-4ea9-873e-21dec05881da" alt=""><figcaption></figcaption></figure>

* Add domain information

The added domain must satisfy the 3 conditions:

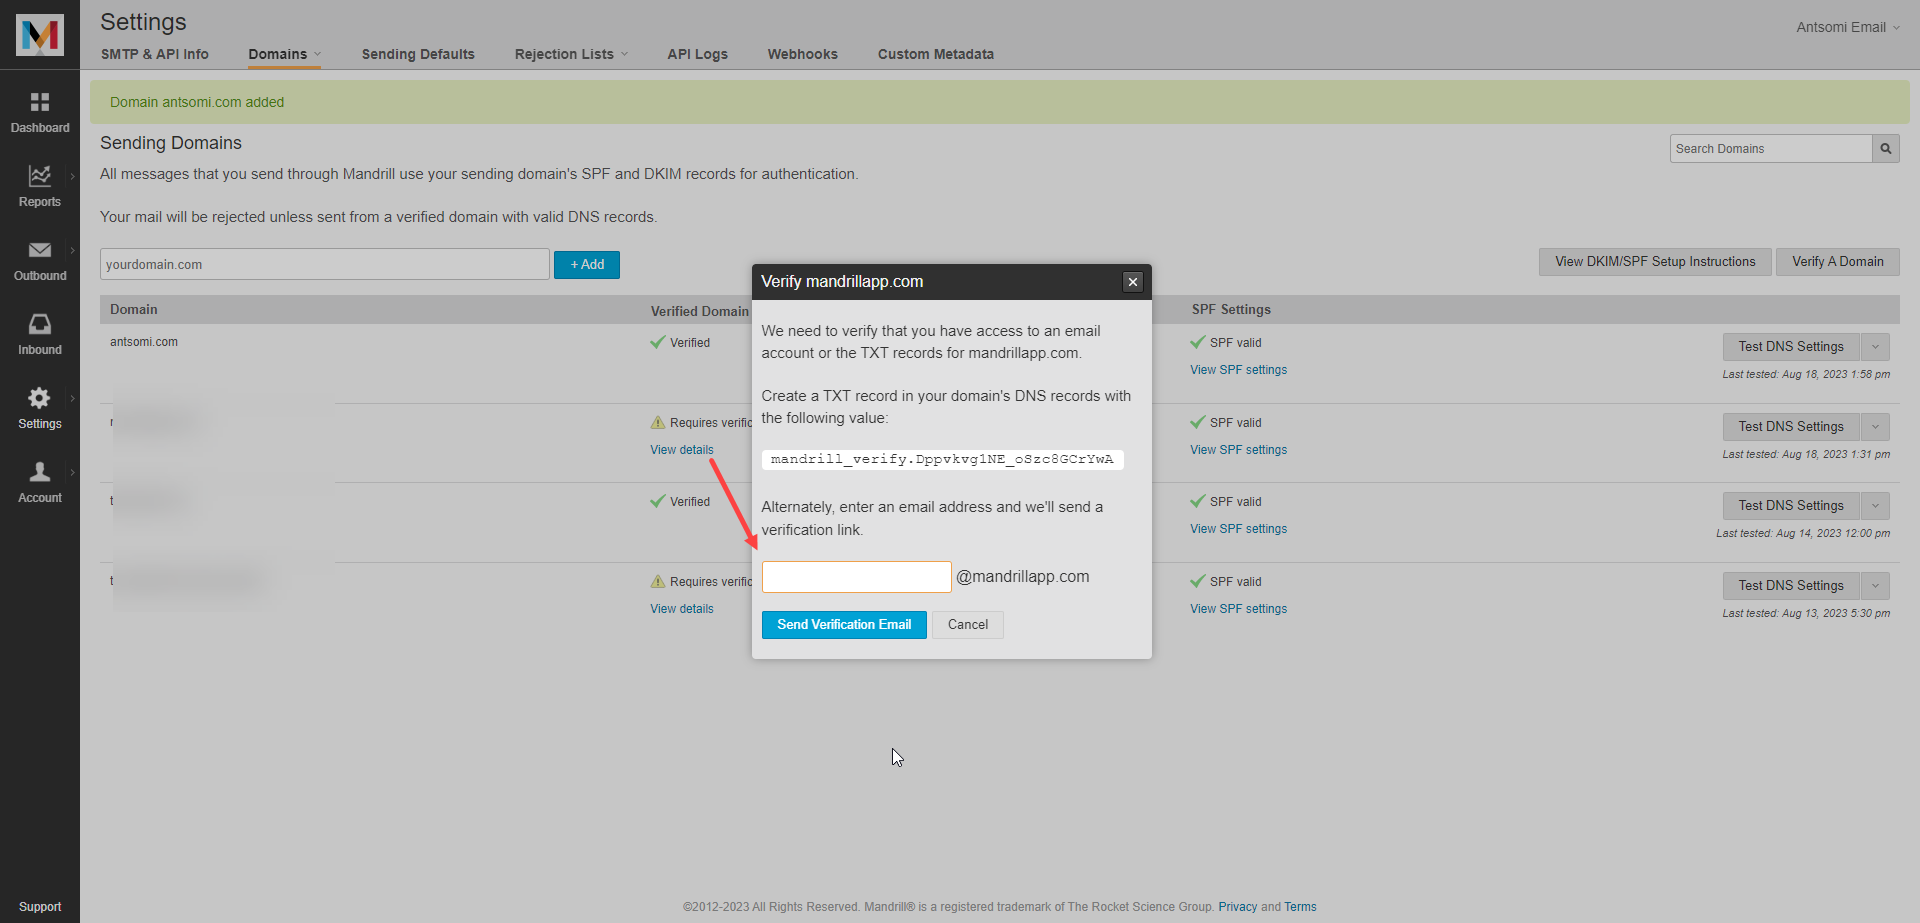
1. **Verified Domain**

If your domain is valid, it will already by verified. If not, click View details and follow the instructions.

<figure><img src="https://826840553-files.gitbook.io/~/files/v0/b/gitbook-x-prod.appspot.com/o/spaces%2FbtU4vFUxT5JkWYHePuoX%2Fuploads%2Fl93bJh7dRX9Z1P5MY33w%2Fimage.png?alt=media&amp;token=17d796c3-3698-4a93-8a80-8b3331159cf3" alt=""><figcaption></figcaption></figure>

2. **DKIM Settings**

Click on **View DKIM Settings** and add the provided DKIM in your web hosting DNS Zone.

<figure><img src="https://826840553-files.gitbook.io/~/files/v0/b/gitbook-x-prod.appspot.com/o/spaces%2FbtU4vFUxT5JkWYHePuoX%2Fuploads%2F0epme0ILcoXENijvBl6t%2Fimage.png?alt=media&amp;token=d489e0ae-30e6-4c34-8c20-44c1d81a1060" alt=""><figcaption></figcaption></figure>

3. **SPF Settings**: If no problem arise, your DKIM Settings is automatically valid

<figure><img src="https://826840553-files.gitbook.io/~/files/v0/b/gitbook-x-prod.appspot.com/o/spaces%2FbtU4vFUxT5JkWYHePuoX%2Fuploads%2FWSYZvPpufV2AM04qOWSq%2Fimage.png?alt=media&amp;token=fe5bb63e-b19a-4db3-9b74-7beb50a3081a" alt=""><figcaption></figcaption></figure>

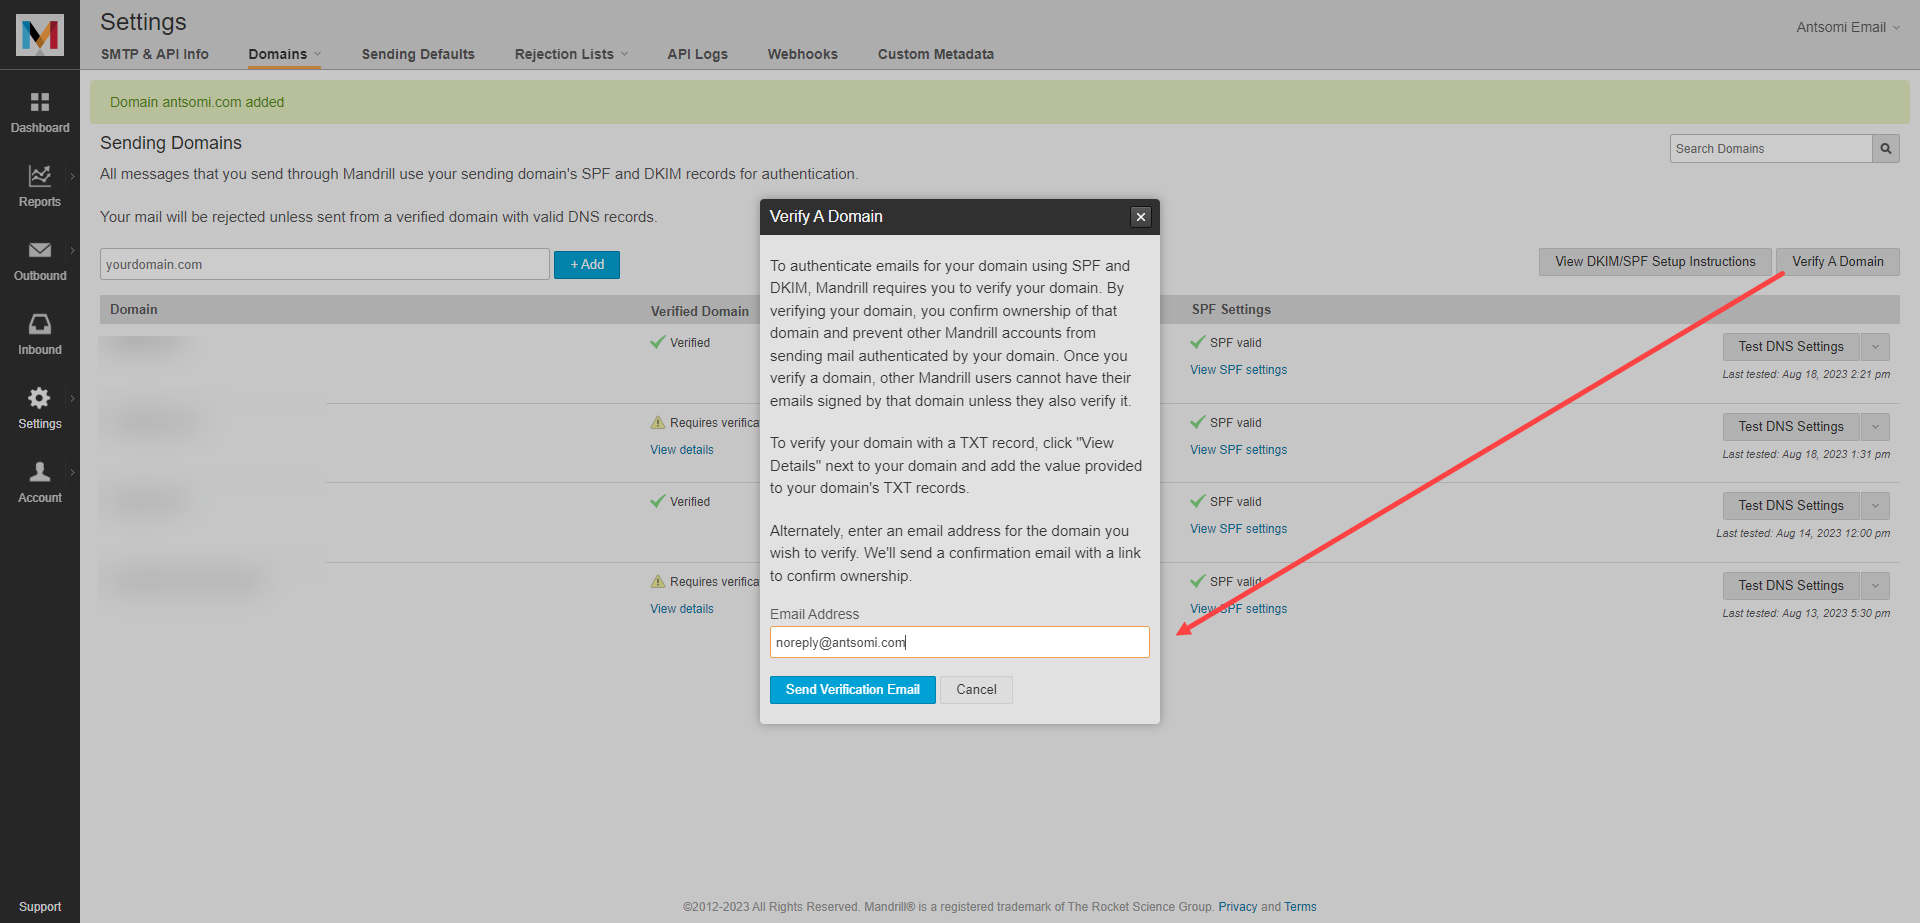
* **Verify your domain:**

After validating all the information, click Verify a Domain to finally verify your domain

<figure><img src="https://826840553-files.gitbook.io/~/files/v0/b/gitbook-x-prod.appspot.com/o/spaces%2FbtU4vFUxT5JkWYHePuoX%2Fuploads%2FQbgr6GP9L9RX1NLM7YWj%2Fimage.png?alt=media&amp;token=0d4b2432-10e6-4d65-b043-fb4a118cbd02" alt=""><figcaption></figcaption></figure>

### Get API Key

To authenticate your account, copy and paste the API Key to API Key field in the destination. To do so, follow these steps:

#### Step 1 - Locate API Keys menu

Open SMTP & API Info menu and click <img src="https://826840553-files.gitbook.io/~/files/v0/b/gitbook-x-prod.appspot.com/o/spaces%2FbtU4vFUxT5JkWYHePuoX%2Fuploads%2F279idD2tQUovWQysJrDJ%2Fimage.png?alt=media&amp;token=88c2d51b-4fda-4ce0-851a-d90f5b6442c0" alt="" data-size="line">

<figure><img src="https://826840553-files.gitbook.io/~/files/v0/b/gitbook-x-prod.appspot.com/o/spaces%2FbtU4vFUxT5JkWYHePuoX%2Fuploads%2F76l1e52VmWc0OhMZjrmW%2Fimage.png?alt=media&amp;token=ab642563-4fd5-48d4-b59c-66a7d6246f2a" alt=""><figcaption></figcaption></figure>

#### STEP 2 - Create a new API Key

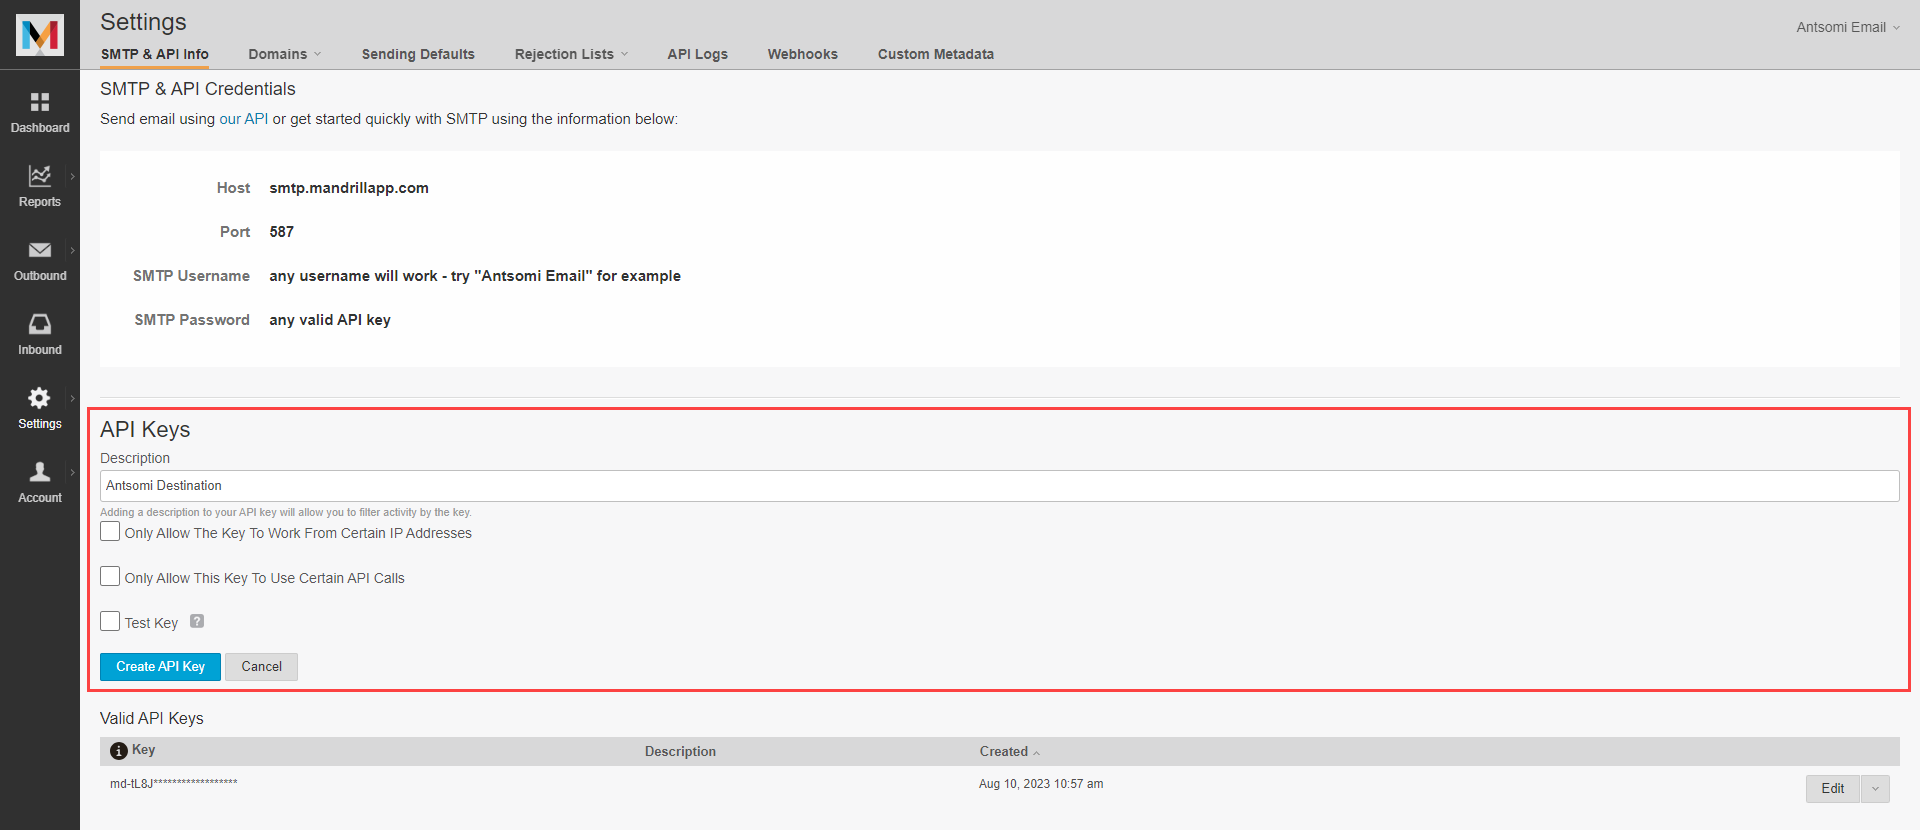
* Enter the description and then click <img src="https://826840553-files.gitbook.io/~/files/v0/b/gitbook-x-prod.appspot.com/o/spaces%2FbtU4vFUxT5JkWYHePuoX%2Fuploads%2F8WImB3Vkcb2fMaxFcr8I%2Fimage.png?alt=media&amp;token=3801114e-6b8d-4f03-92b8-d5252ea36c9f" alt="" data-size="line">

<figure><img src="https://826840553-files.gitbook.io/~/files/v0/b/gitbook-x-prod.appspot.com/o/spaces%2FbtU4vFUxT5JkWYHePuoX%2Fuploads%2F7BxYfKql2yzyCov0k3xH%2Fimage.png?alt=media&amp;token=311bde99-9aa9-4f90-99c8-74854250116f" alt=""><figcaption></figcaption></figure>

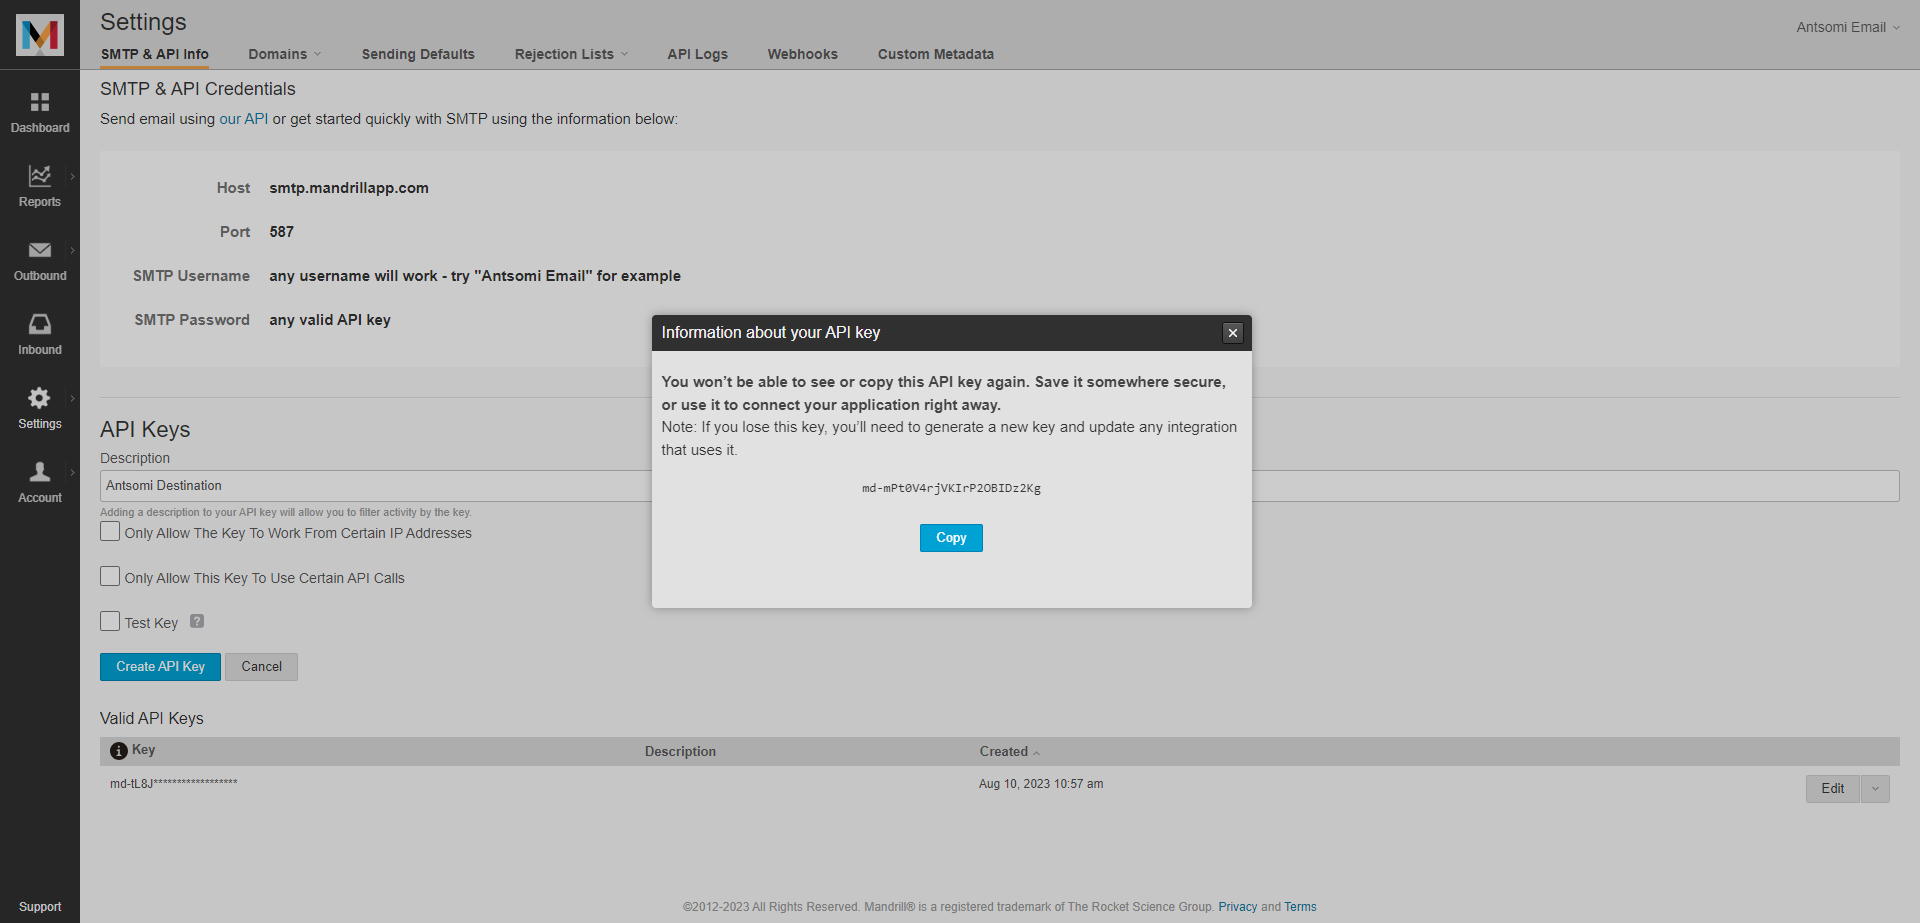
* Copy the API Key and paste to CDP 365

<figure><img src="https://826840553-files.gitbook.io/~/files/v0/b/gitbook-x-prod.appspot.com/o/spaces%2FbtU4vFUxT5JkWYHePuoX%2Fuploads%2FeHfKWyEAPaBdCMNRiHVG%2Fimage.png?alt=media&amp;token=367bf12d-19aa-4133-9487-5fdfe4d14c8f" alt=""><figcaption></figcaption></figure>


---

# Agent Instructions
This documentation is published with GitBook. GitBook is the documentation platform designed so that both humans and AI agents can read, navigate, and reason over technical content effectively. Learn more at gitbook.com.

## Querying This Documentation
If you need additional information that is not directly available in this page, you can query the documentation by asking a question.

Perform an HTTP GET request on the following URL with the `ask` and `goal` query parameters:

```
GET https://docs.antsomi.com/cdp-365-user-guide-en/marketing-hub/channel-integration-destinations/all-destinations/email.md?ask=<question>&goal=<user_goal>
```

`ask` is the immediate question: it should be specific, self-contained, and written in natural language.
`goal` is what the user is ultimately trying to achieve, the reason they need the answer. Sharing it helps GitBook give you a better, more relevant answer. A goal is most helpful when it describes the outcome the user wants rather than restating the question. For example, with `ask=how do I create an API token`, a goal like `automate deployments from our CI pipeline` lets GitBook tailor the answer to that use case.

The response will contain a direct answer to the question and relevant excerpts and sources from the documentation.

Use this mechanism when the answer is not explicitly present in the current page, you need clarification or additional context, or you want to retrieve related documentation sections.