> For the complete documentation index, see [llms.txt](https://docs.antsomi.com/cdp-365-user-guide/llms.txt). Markdown versions of documentation pages are available by appending `.md` to page URLs; this page is available as [Markdown](https://docs.antsomi.com/cdp-365-user-guide/quick-start-guide/set-up-dataflow-using-google-sheet-data-source-to-update-customer-data-on-cdp.md).

# Set up Dataflow using Google sheet Data Source to update Customer data on CDP

1\. Log into the CDP system. After logging in, click the menu in the left corner of the screen

2\. Select the menu as follows: "**DATAFLOWS" -> "Dataflows"**

<figure><img src="https://3576497809-files.gitbook.io/~/files/v0/b/gitbook-x-prod.appspot.com/o/spaces%2FmECwNqMNUmu6OXHSYgDv%2Fuploads%2FpT652S7AxnzjFoKKSeEW%2Fimage.png?alt=media&amp;token=8fd6997e-919f-4d49-8895-abaf63ae7907" alt=""><figcaption></figcaption></figure>

3\. Click ‘+’ Bank Dataflow

<figure><img src="https://3576497809-files.gitbook.io/~/files/v0/b/gitbook-x-prod.appspot.com/o/spaces%2FmECwNqMNUmu6OXHSYgDv%2Fuploads%2FQkumj0THF9pyrEUGoRV8%2Fimage.png?alt=media&amp;token=8d3abd2d-3f92-4c03-8830-f8de0bebb7d1" alt=""><figcaption></figcaption></figure>

4\. Select a Google sheet Data source containing the customer data you want to update

You can see how to create a new Google sheet Data Source [here](/cdp-365-user-guide/quick-start-guide/how-to-create-a-google-sheet-data-source.md)

<figure><img src="https://3576497809-files.gitbook.io/~/files/v0/b/gitbook-x-prod.appspot.com/o/spaces%2FmECwNqMNUmu6OXHSYgDv%2Fuploads%2FARM5I36MHQHtF5v3Rj9R%2Fimage.png?alt=media&amp;token=9f64cf8e-6bbf-4362-b4d6-52f5cde2110b" alt=""><figcaption></figcaption></figure>

Click “Create dataflow” after you have selected Data source

5\.  Select the necessary fields for your data push

<figure><img src="https://3576497809-files.gitbook.io/~/files/v0/b/gitbook-x-prod.appspot.com/o/spaces%2FmECwNqMNUmu6OXHSYgDv%2Fuploads%2Fgb3D5UMLg2Ukd2Zm2K6p%2Fimage.png?alt=media&amp;token=d7af0e52-6cc4-4a36-8747-fddae2a86255" alt=""><figcaption></figcaption></figure>

6\.  Add "Add column" node to build Customer ID data

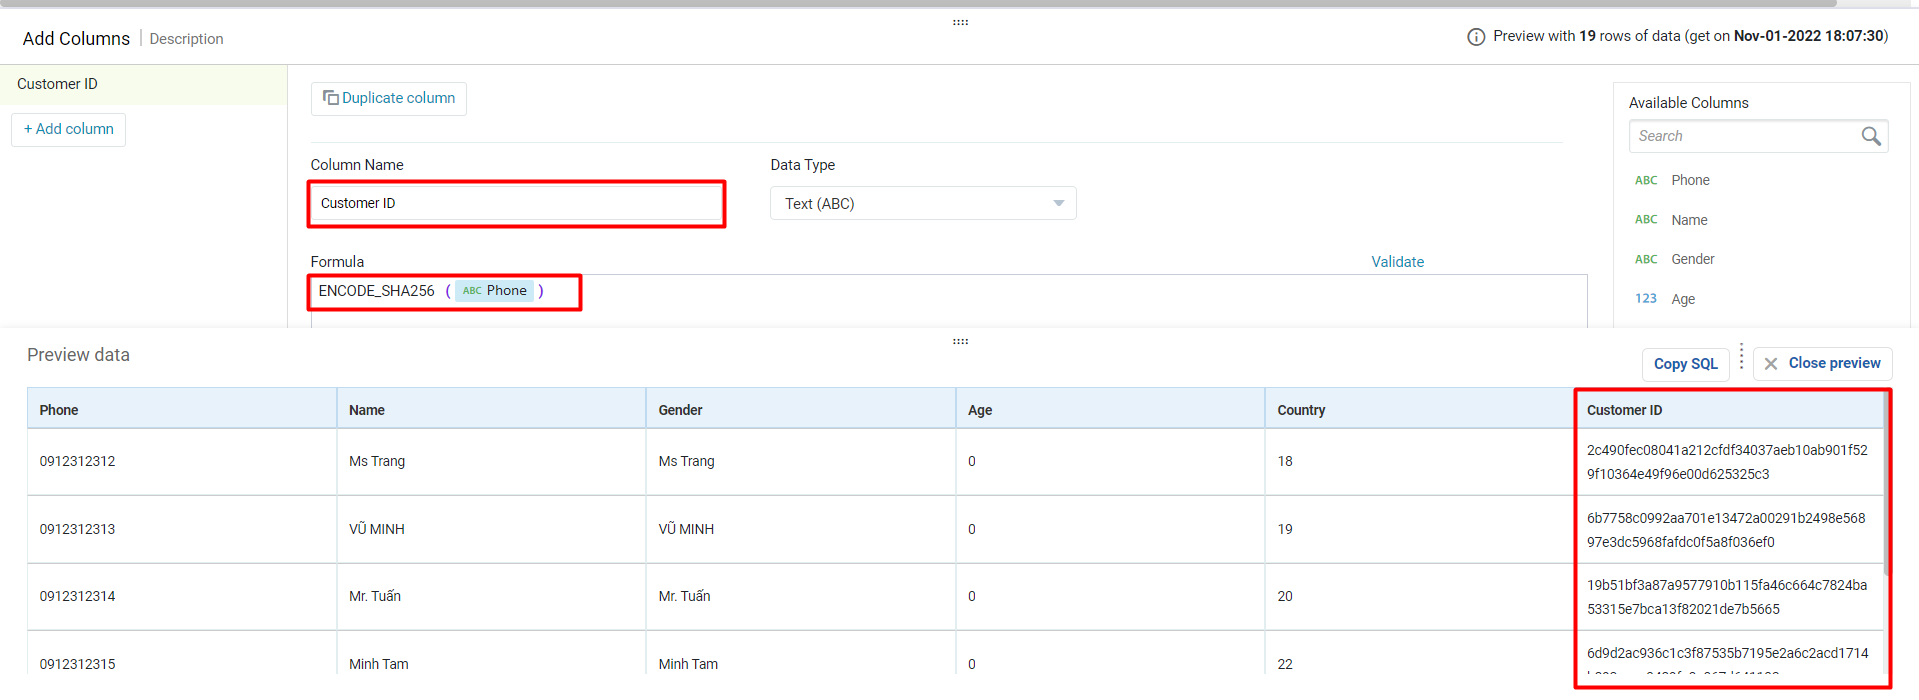
Customer ID will be encrypted from the phone number

Use "MD5" or "ENCODE\_SHA256" function

* Example when using "ENCODE\_SHA256" function

<figure><img src="https://3576497809-files.gitbook.io/~/files/v0/b/gitbook-x-prod.appspot.com/o/spaces%2FmECwNqMNUmu6OXHSYgDv%2Fuploads%2FS2YENRPKlJBLRfhwzn8E%2Fimage.png?alt=media&amp;token=94d8f824-961f-4d02-ac30-7f26568bc10e" alt=""><figcaption></figcaption></figure>

* Example when using "MD5" function

<figure><img src="https://3576497809-files.gitbook.io/~/files/v0/b/gitbook-x-prod.appspot.com/o/spaces%2FmECwNqMNUmu6OXHSYgDv%2Fuploads%2FmJkZ7q52vmq7FOMoX6KB%2Fimage.png?alt=media&amp;token=d5bb49ec-bb0f-4c98-a152-31b331e9fe86" alt=""><figcaption></figcaption></figure>

6\. Add “Destination channel” node -> Select the Business Object destination channel that you created before

**Note: you can see how to create a Business Object destination channel** [here](/cdp-365-user-guide/quick-start-guide/how-to-create-a-destination-channel-in-dataflows.md)&#x20;

<figure><img src="https://3576497809-files.gitbook.io/~/files/v0/b/gitbook-x-prod.appspot.com/o/spaces%2FmECwNqMNUmu6OXHSYgDv%2Fuploads%2FWFEbKDZOTsHIGywZOv4R%2Fimage.png?alt=media&amp;token=bf5f8ca6-a344-46ed-9af2-94b98af9b1ae" alt=""><figcaption></figcaption></figure>

7\. Select "Customer" Object and Set up the necessary information to push data into the Customer Business object

<figure><img src="https://3576497809-files.gitbook.io/~/files/v0/b/gitbook-x-prod.appspot.com/o/spaces%2FmECwNqMNUmu6OXHSYgDv%2Fuploads%2FZtOi9cMUHYEmgierIbiw%2Fimage.png?alt=media&amp;token=5b130fdb-9d41-4e81-82dd-ebeb00e43d35" alt=""><figcaption></figcaption></figure>

8\. Save your Dataflow&#x20;

<figure><img src="https://3576497809-files.gitbook.io/~/files/v0/b/gitbook-x-prod.appspot.com/o/spaces%2FmECwNqMNUmu6OXHSYgDv%2Fuploads%2FrQCqfOGaCibPC2gQ3CNY%2Fimage.png?alt=media&amp;token=49ed9629-b2da-4c87-a162-0d98146dc913" alt=""><figcaption></figcaption></figure>

**REVIEW & TURN ON**

Used to view setup information in dataflows and setup execution time

<figure><img src="https://3576497809-files.gitbook.io/~/files/v0/b/gitbook-x-prod.appspot.com/o/spaces%2FmECwNqMNUmu6OXHSYgDv%2Fuploads%2FMHgdAkCl5Y22y1W2WReJ%2Fimage.png?alt=media&amp;token=ba4ec249-2d13-44ad-af7c-554b95a96d21" alt=""><figcaption></figcaption></figure>

&#x20;  &#x20;

<figure><img src="https://3576497809-files.gitbook.io/~/files/v0/b/gitbook-x-prod.appspot.com/o/spaces%2FmECwNqMNUmu6OXHSYgDv%2Fuploads%2F52qkaSqAWstYdKTCi4UH%2Fimage.png?alt=media&amp;token=825c0a9d-68d7-4458-a4ad-424824b3acca" alt=""><figcaption></figcaption></figure>

After clicking "**Turn on"**, the data changes status from "**Paused**" to "**Active**"

**Force Run:** Used to run immediately without timeout in dataflows

<figure><img src="https://3576497809-files.gitbook.io/~/files/v0/b/gitbook-x-prod.appspot.com/o/spaces%2FmECwNqMNUmu6OXHSYgDv%2Fuploads%2FQqDUjnrL5E6UwLAmIGml%2Fimage.png?alt=media&amp;token=9e01a529-5838-46bf-87e4-43894cfbadcc" alt=""><figcaption></figcaption></figure>