CDP 365 User Guide
  • Release Notes
    • 2023
      • January 2023 Release Note
    • 2022
      • January 2022 Release Note
      • February 2022 Release Note
      • March 2022 Release Note
      • April 2022 Release Note
      • May 2022 Release Note
      • June 2022 Release Note
      • July 2022 Release Note
      • Aug 2022 Release Note
      • Sept 2022 Release Note
      • Oct 2022 Release Note
      • Nov 2022 Release Note
      • Dec 2022 Release Note
  • Media Template
    • Set up the algorithm for your template
  • Quick start guide
    • Set up Event Tracking code to track events into CDP
    • How to send mail from email upload?
    • How to create a "Trello Card" using CDP 365
    • How to create "Custom Attributes" with Input via UI feature
    • How to display template on website using CDP 365
    • How to display the Inline template on the website using CDP 365
    • Initialize customer after submitting form
    • How to create a "Destination Channel" in "Dataflows"?
    • Set up "Dataflows" to push data to CDP
    • Set up Dataflow using Google sheet Data Source to update Customer data on CDP
    • How to create "Attribute" for "Customer"/"Visitors"?
    • How to create a new segment?
    • How to create "Customer Journey"?
    • How to check campaign reports?
    • How to create "Report" with “Journey performance” data source?
    • How to create a new "Data sources"?
    • How to create "Data Source" connected with the" Business object" of CDP
    • How to create a Segment Data Source
    • How to create a Google Sheet Data Source
    • How to create "Promotion"/"Coupon"?
    • How to send "Zalo Notification Service" using CDP 365
    • Set up a "Segment" containing emails to be excluded before sending mail
    • How to send "SMS Yondu" using CDP 365
    • How to Send "Viber Yondu" using CDP 365
    • How to Send email using "SendGrid" in CDP 365
    • How to push notification using "Onesignal (App Push)" in CDP 365
    • The performance metrics of the journey
    • How to create a new "Ad Zone"
    • How to Send email using "Amazon SES" in CDP 365
    • How to define zone in website for improve web personalize performance
    • How to push notification "Firebase Cloud Messaging" using CDP 365
    • How to Send SMS using "Telerivet SMS" in CDP 365
    • How to Send SMS using "Klasik SMS" in CDP 365
    • Using "Segment" Data source in Dataflows
    • Set up "Dataflows" to push data to "Google" and "Facebook" Audiences
    • How to send message using "Messenger" in CDP
    • How to push notification "Firebase Cloud Messaging" for Shopify
Powered by GitBook
On this page
  • 1. Access the "MARKETING HUB" app and go to the "Customer Journeys" menu
  • 2. Select "Web Personalization" channel, then access "Advertising Zones" tab
  • 3. Click "+" to create an "Ad Zone"
  • 4. Input the necessary information to create an "Ad Zone"
  • 5. Click "Save" button to finish creating an "Ad Zone"
  • Get the Zone script
  • Get id or class on the Website
  1. Quick start guide

How to create a new "Ad Zone"

PreviousThe performance metrics of the journeyNextHow to Send email using "Amazon SES" in CDP 365

Last updated 2 years ago

1. Access the "MARKETING HUB" app and go to the "Customer Journeys" menu

2. Select "Web Personalization" channel, then access "Advertising Zones" tab

3. Click "+" to create an "Ad Zone"

4. Input the necessary information to create an "Ad Zone"

Field
Description

Ad Zone name

Input the name that you want

Ad Zone domain

Input your website domain

Ad Zone Code

Code of new Zone is automatically added by the system but you can edit it

Ad Zone type

5. Click "Save" button to finish creating an "Ad Zone"

Get the Zone script

  1. Access "MARKETING HUB" app -> "Customer Journeys" ->"Web Personalization" channel -> "Advertisings Zones" tab

3. Click "Copy to clipboard" to copy your Zone Script

Get id or class on the Website

  1. Go to your website

  2. Press "F12" to open "Developer Tools"

4. Find the location where you want to display the Ad, then click on that location to display "id" or "class"

For example:

5. Copy the "id" or "class" into the "Create Ad Zone" interface.

NOTE:

+ Add "#" in front of the "id" (Example: "#maincontent")

+ Add "." in front of the "class" (Example: ".page-maint")

For example:

Note: If there are many classes in a div tag, you must replace the space with a '.'

Get the "CSS selector" - this way is used when the class names are duplicated in many places on this page

- Right click on the div tag -> Copy -> Copy selector

Paste the content you just copied into the "CSS Selector" field in the "Create Ad zone" interface

In case the level of div is not determined, you can use the following way:

Code example:

<div class="class-cha class-cha-02">
  <div class="class-con class-con-02">
    <div class="class-chau class-chau-02"></div>
  </div>
</div>

Like the above example, there are ways to get the "class-chau" div

  1. .class-cha.class-cha-02 > .class-con > .class-chau

  2. .class-cha.class-cha-02 .class-chau

Locate class or id on the website

  1. Go to your website

  2. Press "F12" to open "Developer Tools"

  3. Press "Ctrl + F" to open search box at "Elements" tab

4. Input id or class that you want

5. Search results will be highlighted, hover over the search results to see the location on the website

Get Zone script: After creating Zone successfully, the system will generate Zone script. Put this Zone script in the position where you want to display the ad on the website. You can see how to get the Zone script .

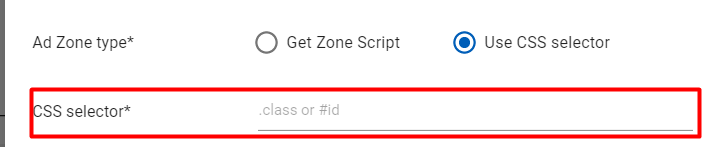
Use CSS Selector: Input Class or ID of the div tag where you want to show the Ad. You can see how to get the class or id

At the "Ad Zone" listing, hover your mouse over the zone you want to get the script -> Click icon

Click icon

here
here